AgileXRM Quick Start
Home –> AgileXRM Quick Start
Introduction
This QuickStart document describes how to create a sample process from scratch.
The content of the process is oriented to show several AgileXRM features using the components of the platform:
-
AgileXRM Envision: For Modeling the Process and the Dialog
-
AgileXRM Process Manager: For viewing and visually managing the Process
The sample process here is not based on a real scenario; the idea is to show the basic concepts of AgileXRM.
The walkthrough starts with a very simple Process and through the following stages, new activities and steps are added.
The time needed to complete this walkthrough is around 50 minutes.
Quick Start Pre-requisites
This document assumes that: <!–
-
Publish the managed solution AgileXRMQuickStart_1_0_0_1_managed.zip to CRM. It contains all the necessary entities and customizations to run this QuickStart guide successfully.
-
Publish the Dialog called Update Children Entity Dialog. It contains a predefined SubDialog that we will be using along with this walkthrough guide.
-
There are some sample Contact records (if not add them now).
-
You have an Activated and working copy of Visio 2010 / 2013 (can be Trial version, but should be Activated) –>
- The following actions need to be done only once, the very first time you use the modeler.If not was previosly performed , do them now:
- Enable CDS entitites
Stage 1: Designing and running your first process
Duration: 10 minutes
Objectives: Show basic concepts of modeling, publishing and running a process
Scenario
We have a custom entity in CRM called Parent Entity. The process will manage the lifecycle of Parent Entity. We will create a CRM Task and when this Task is completed, the Status of the record will be changed to Inactive.
Create the process template
-
Launch Envision from your computer and connect to your organization. If you have any issue to execute ENVISION check this guide: Configure the process modeler remote connection
-
When ENVISION is loaded the first step we need to do is create an AgileXRM application.
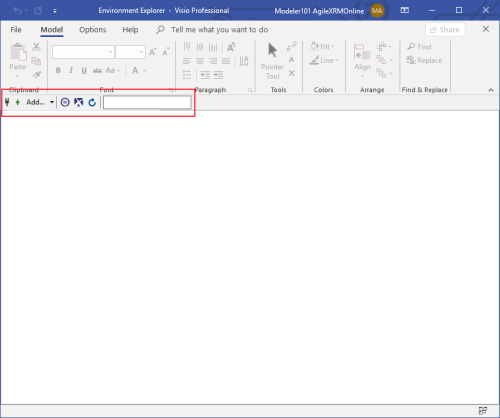
The actions toolbar will allow you to:
- Change your environtment connection
- Create Applications
- Create AgileDialogs process templates
-
Create AgileXRM process templates

Also action toolbar allows you to search your process templates.
Create a new AgileXRM Application
An AgileXRM application is a logical grouping of AgileXRM and AgileDialogs Process templates
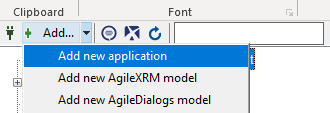
Provide an Aplication name.

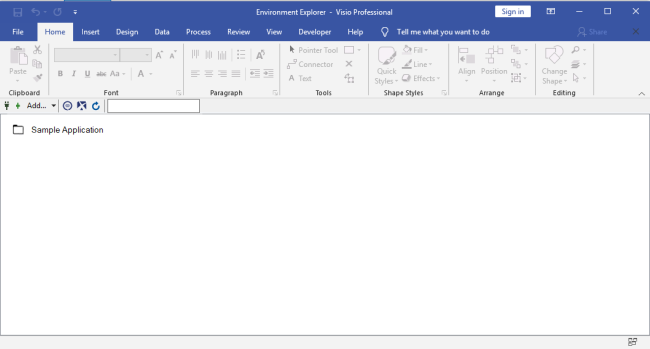
Created application is shown as a Folder view in Environment Explorer.
Create an AgileXRM/AgileDialogs process template
From actions toolbar
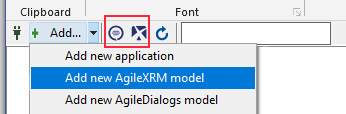
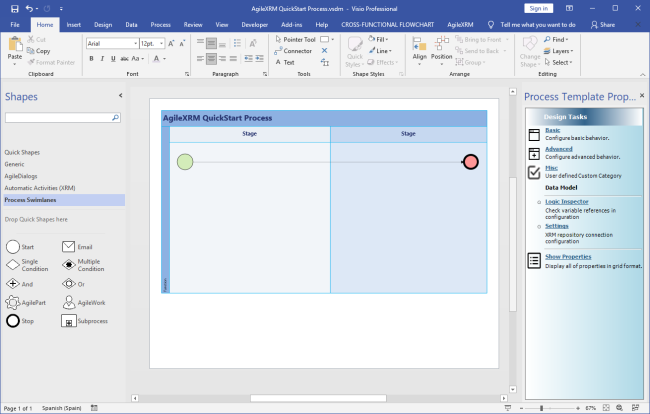
New document is created and the XRM Connection window is shown.
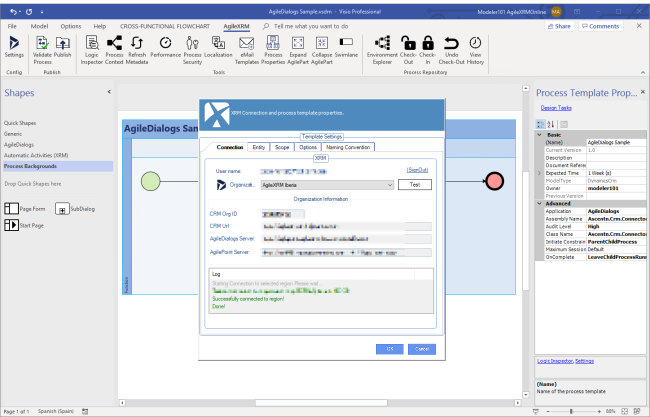
Basic elements as the Start and Stop activity and process swimlane are automatically created
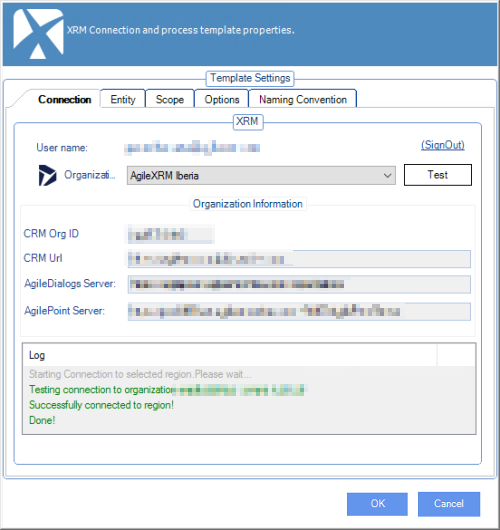
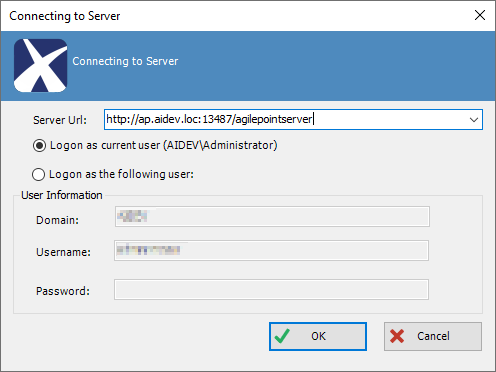
Configure Connection Settings
Enter the CRM Server URL, Organization name (use your own values) and AgileDialogs Server
Choose the organization againt you will model your template from the available list and click OK.
Configure Main Entity
A MainEntity defines entity record that will be the …
From Connection Settings window:
-
Go to Entity tab
-
Click Retrieve Entities button to get the list of AgileXRM-enabled entities for selected organization
-
Open the Main Entity drop-down list and select and entity type. Also we can choose Child entities, Parent Entities and releated entities. Be careful to select only the data you will need in the process.
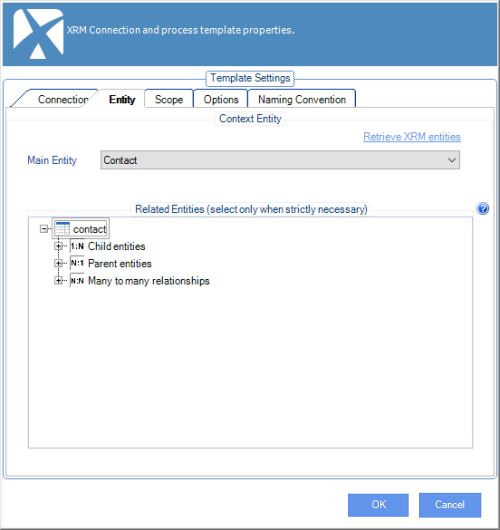
Main Entity is optional for AgileDialogs Processes
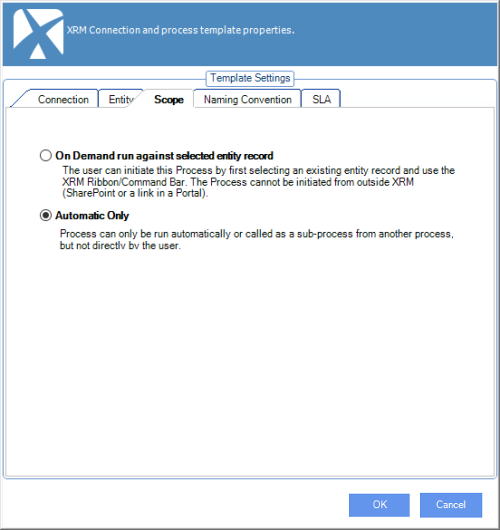
Scope
AgileDialogs.
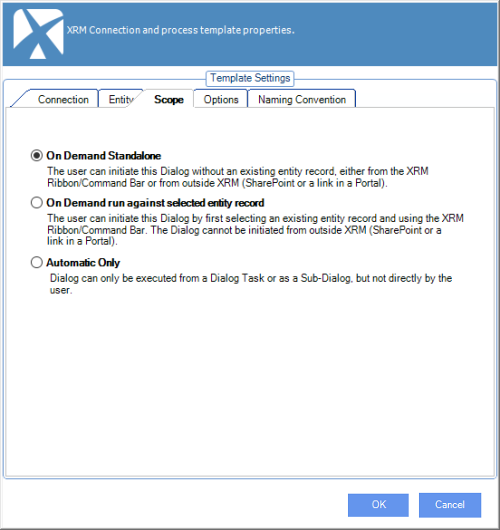
AgileXRM.
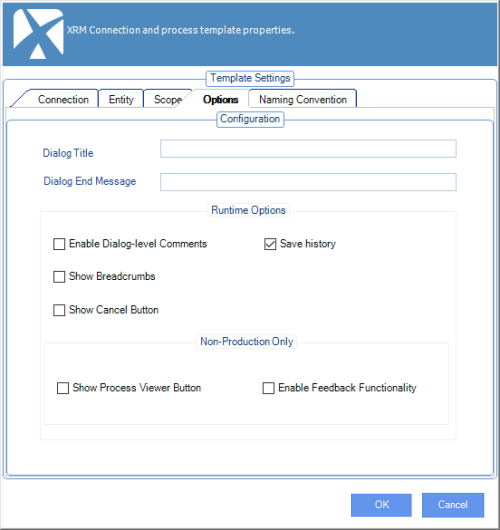
Options
Only for AgileDialogs process Templates.
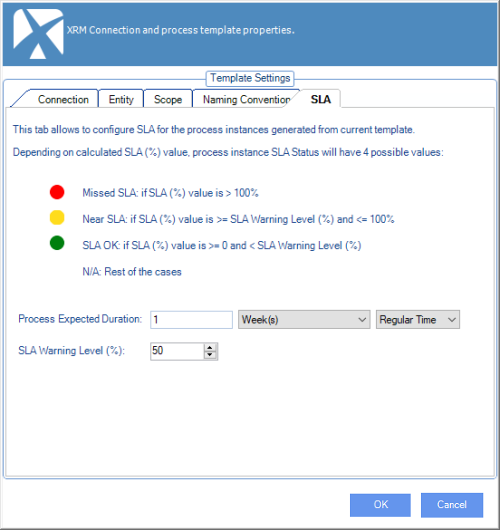
SLA
Only for AgileXRM process Templates.
Process Template Name
-
Click on the Naming Conventions tab
-
Type the name as AgileXRM QuickStart Process (IMPORTANT: Make sure the name is exactly typed as shown)
-
Click Apply and then OK to close XRM Connection window

Add steps (shapes)
-
From the Generic stencil, drag a Start shape to the canvas
-
Drag a Stop shape to the canvas
-
Click the XRM Manual Activities stencil to open it
-
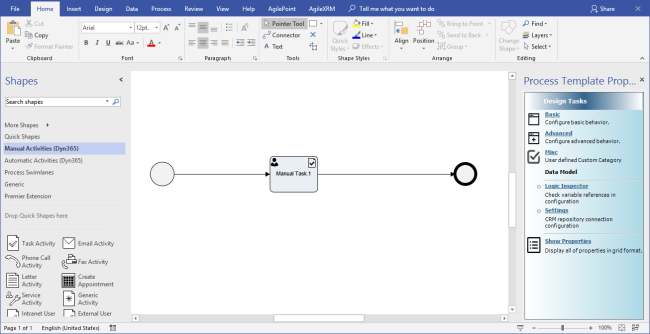
Drag a Create Task shape to the canvas
-
Double-click the shape to change the text to Task 1
-
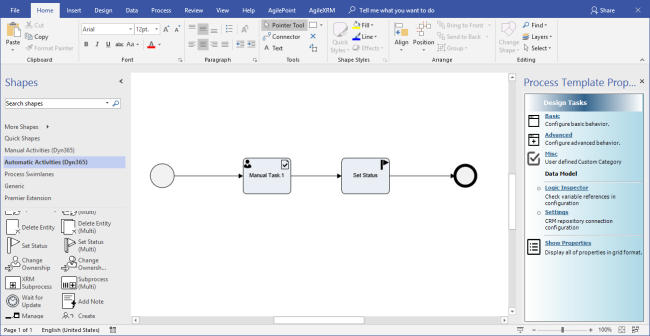
Click the XRM Automatic Activities stencil to open it
-
Drag a Set Status shape to the canvas and name it Set Inactive Status
-
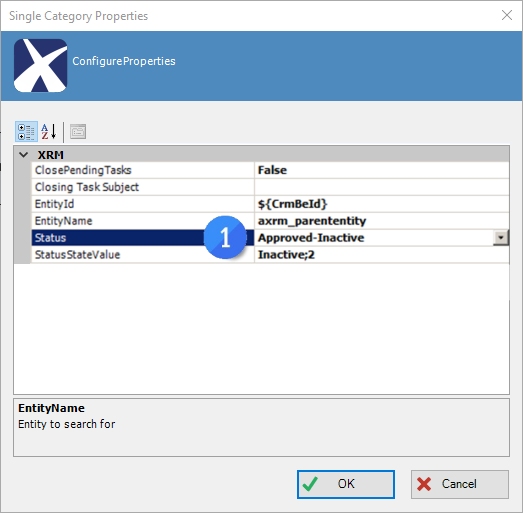
While the shape is selected, click the XRM category in Design Tasks to open the property window
-
In the Status property, select Approved-Inactive
-
In the AfterSubmitAction property, select Mark as completed. Once finished the work, the CRM task will autocomplete itself and will keep moving forward through the process flow.
-
Click OK to close this window
-
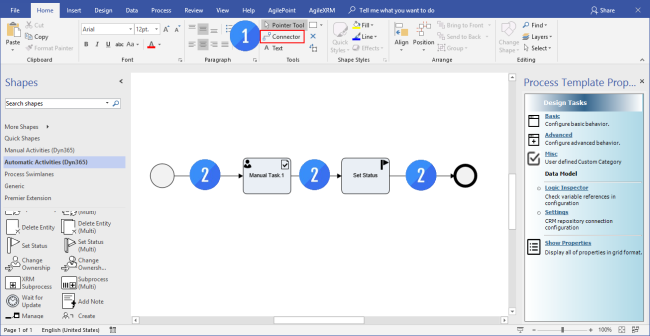
Click the Connector Tool in the Ribbon
-
Connect the shapes to define the flow of the process
The process is modeled and ready to be published.
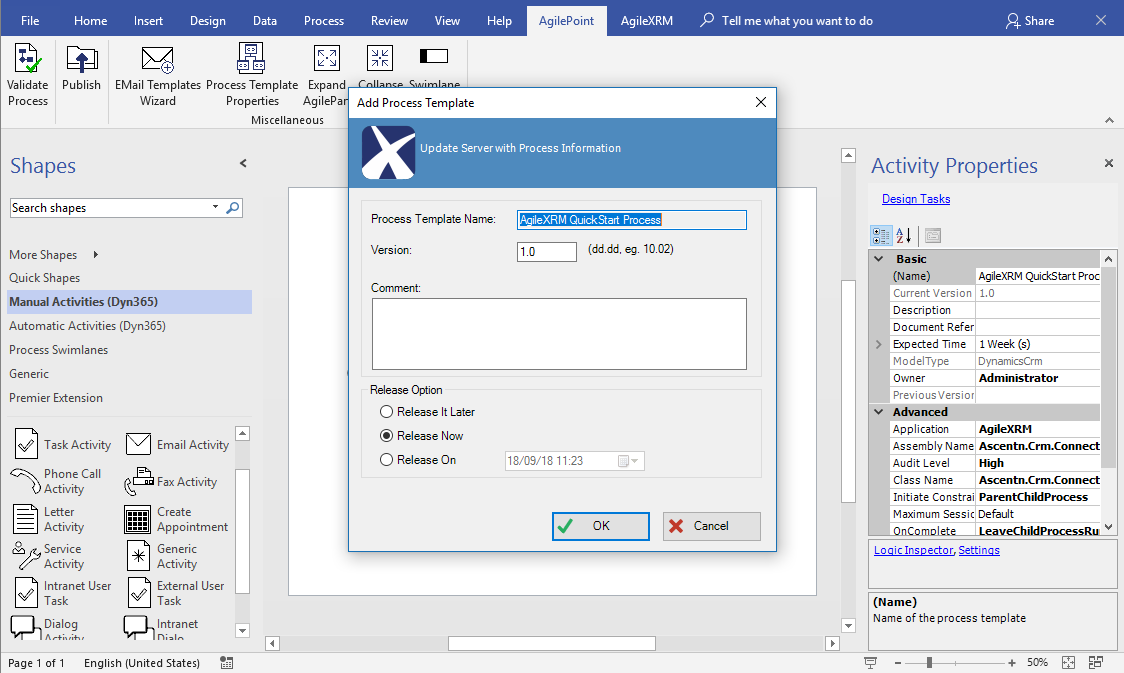
Publish Process
-
Open the AgilePoint Ribbon
-
Click Publish Process to Server to open the publish window
Review process information and verify Release Option is Release Now and click OK
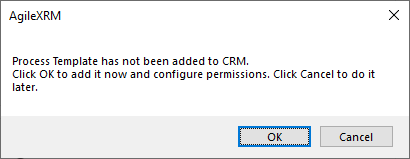
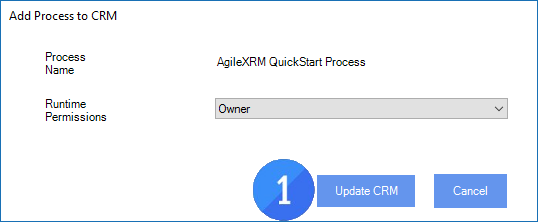
- To add Process Template to Dynamics CRM, click OK to open the permission window
- Click the Update CRM button
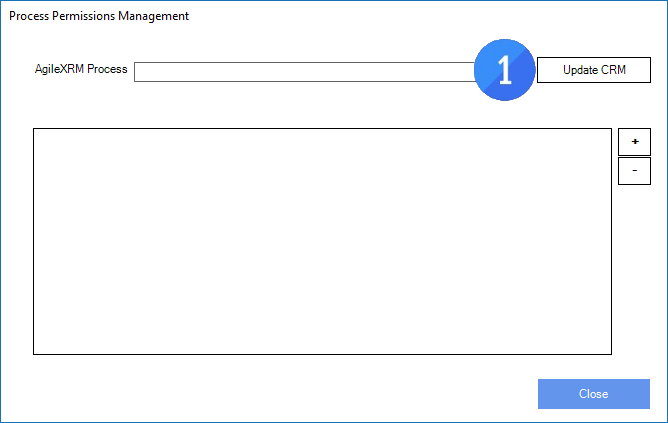
- Leave Runtime Permissions as Owner and click the Update CRM button
-
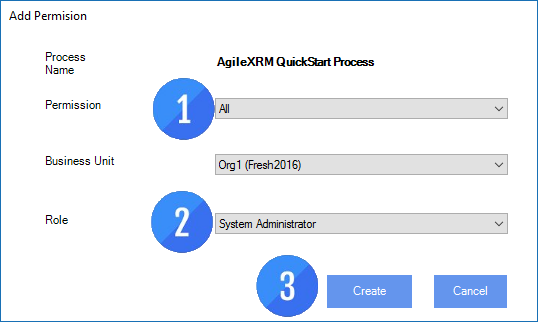
Click the + button to open the Add Permission window
-
In Permission select All
-
Select System Administrator in Role
-
Click the Create button
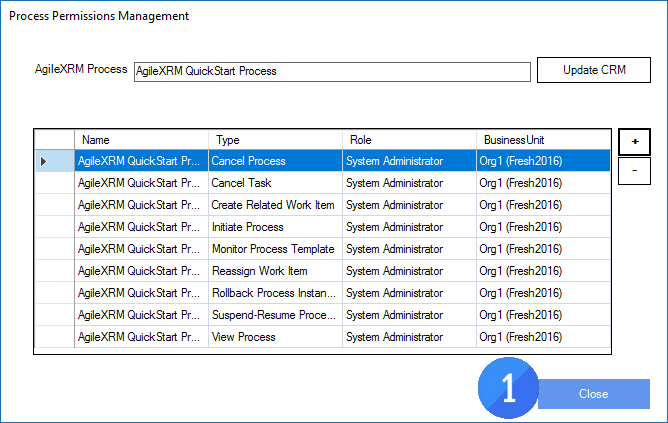
- Click the Close button
- Save the Visio file, name it AgileXRM QuickStart Process.vsdm
The process is deployed and ready to be executed.
Running the process
An AgileXRM process can be initiated in several ways:
-
From a portal using a URL
-
From AgileXRM web parts in a SharePoint site
-
By calling AgilePoint web services
-
By AgilePoint Event Service (scheduler, file drop, incoming email etc.)
-
Using a CRM Workflow or Plugin
In this example, we are going to create a CRM Workflow to start the process:
-
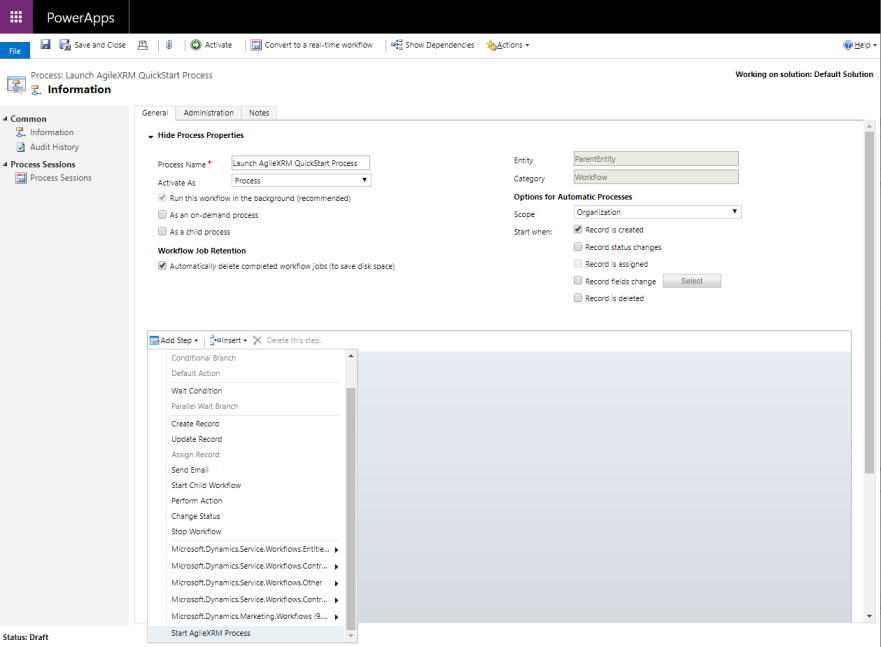
In CRM, go to Settings Processes New
-
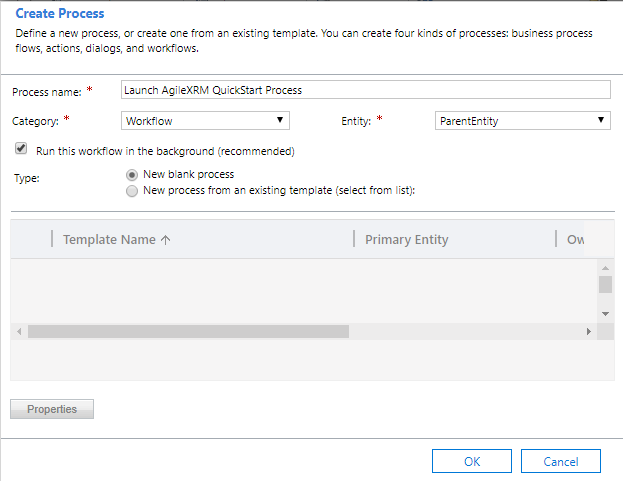
In Create Process window, type Process name as Launch AgileXRM QuickStart Process, Select Parent Entity in Entity drop-down and set Category to Workflow and click OK.
-
A new Workflow is creat for the Parent Entity
-
Select to start when Record is created
-
Add Step: Start AgileXRM Process
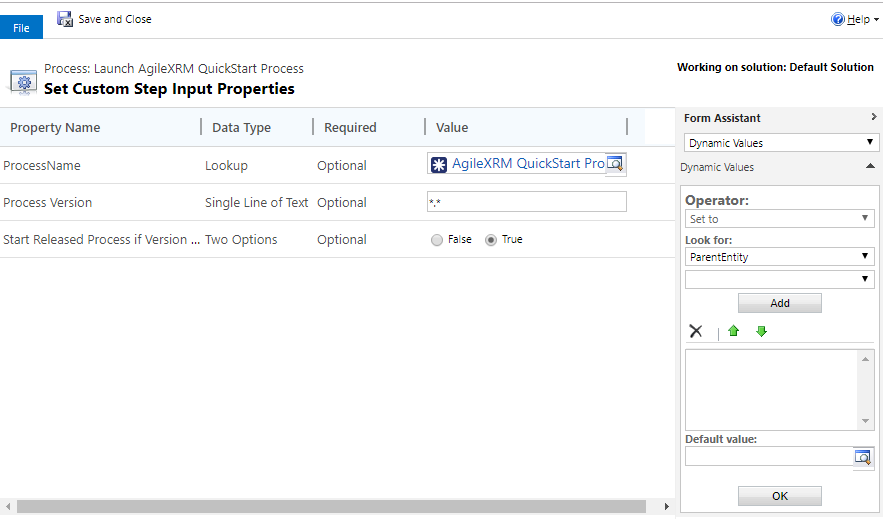
Configure the step to launch the previously created process:
-
Select AgileXRM QuickStart Process in the ProcessName lookup
-
Save the Workflow and Activate it, confirm activation and Close the Workflow
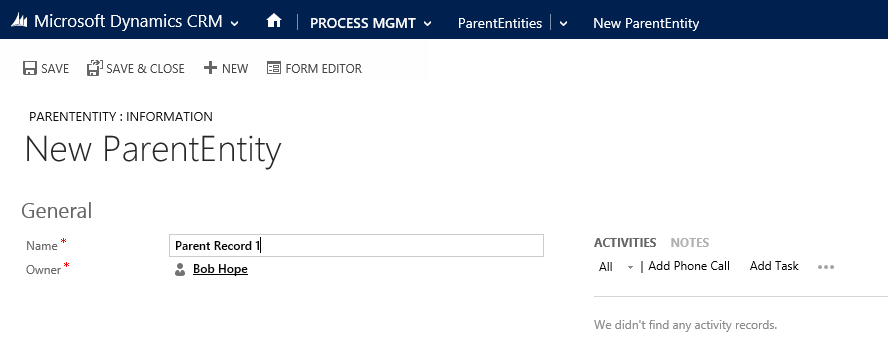
- Create a new Parent Entity record and call it Parent Record 1
-
Click Save & Close, wait a few seconds so that CRM Workflow is executed and then click F5 to refresh the record
-
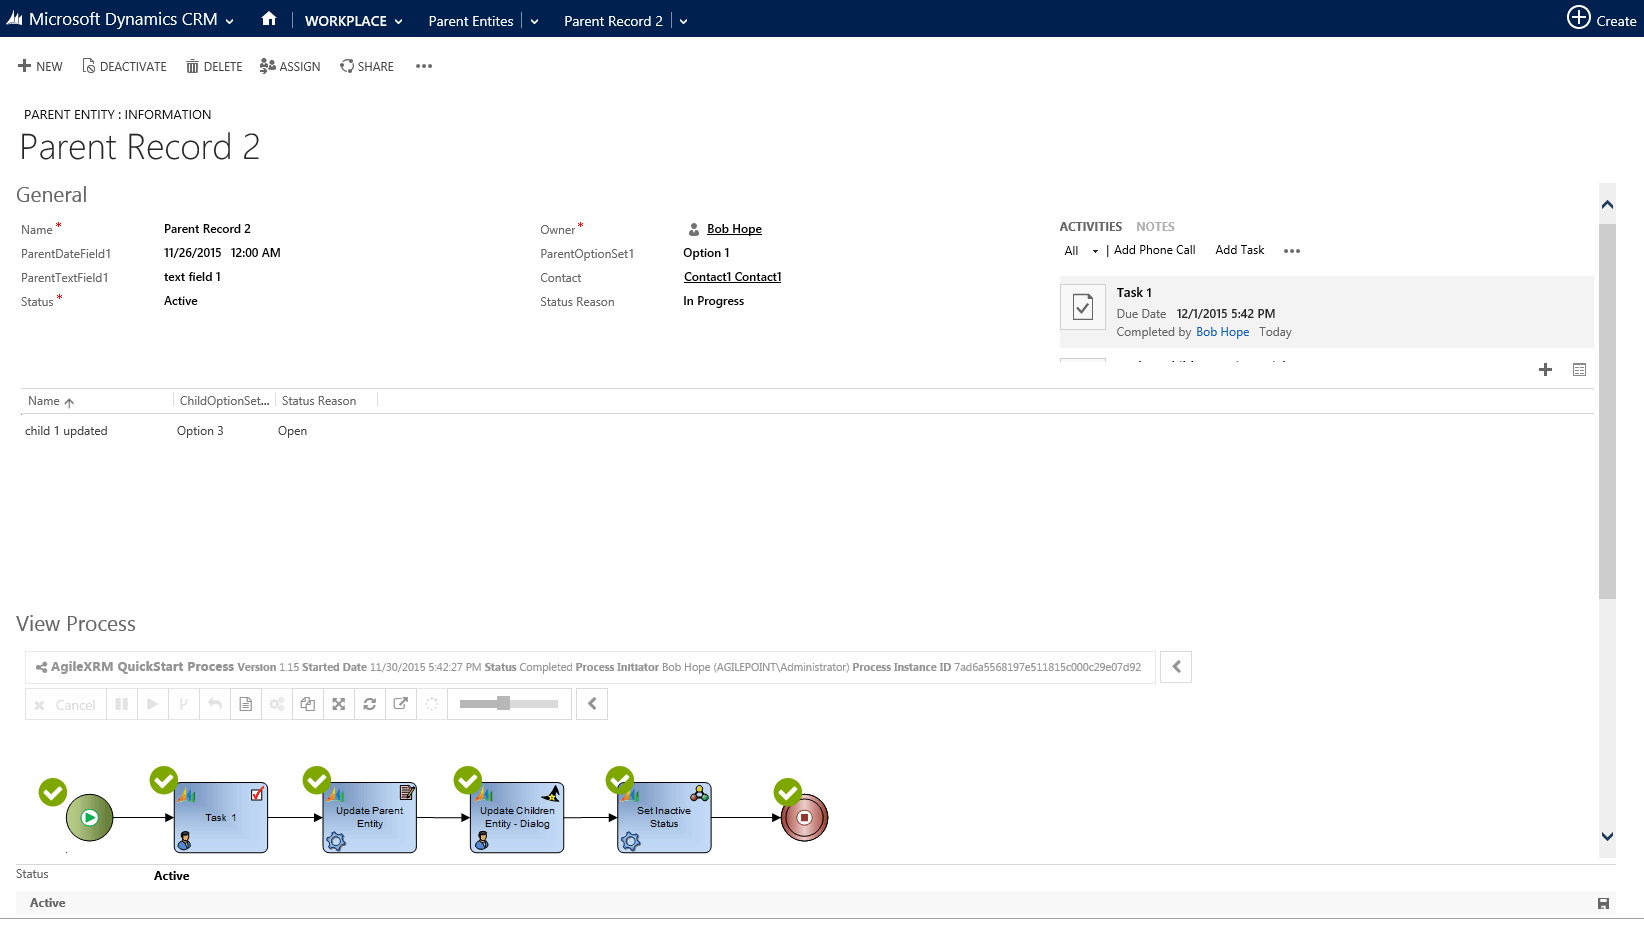
Double-click on the created Parent Record, and notice that the attached process has been executed.
(If such process instance does not appear, it means that the environment has not been set up correctly - Please create a Post in the Forum forum.agilexrm.net under Installation & Setup Discussions to get help)
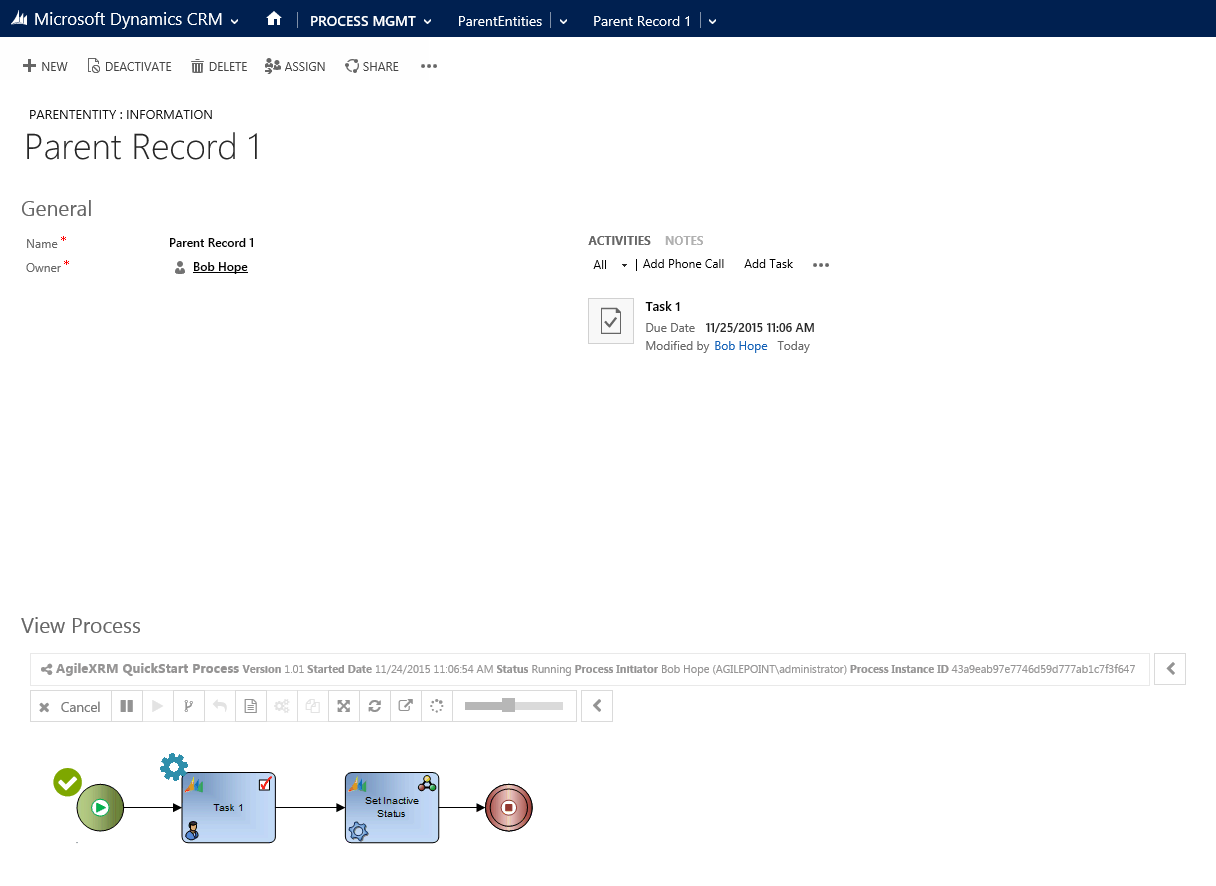
Congratulations! You’ve successfully launched your very first AgileXRM Process!
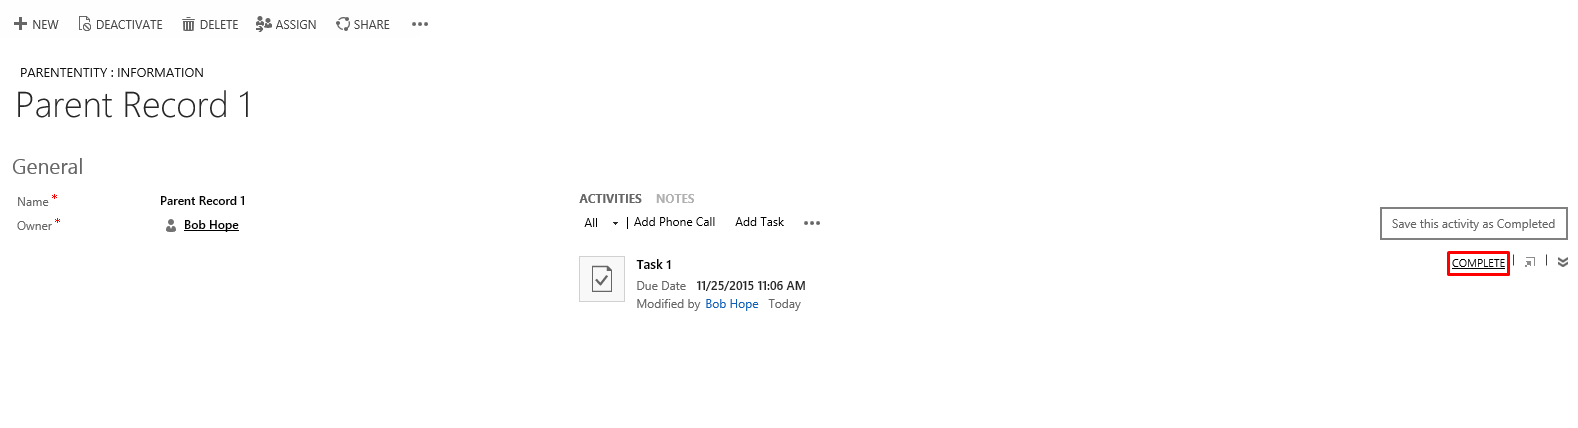
Now let’s complete the Task created by the process and see the process move forward:
- On Activities section, focus on Task 1 and click Complete.
- Refresh the screen (by pressing F5), check View Process section and notice that the process has continued past Task 1 to Set Inactive Status and inactivated the record and finished
(This record will now be under the Inactive Parent Entities View)
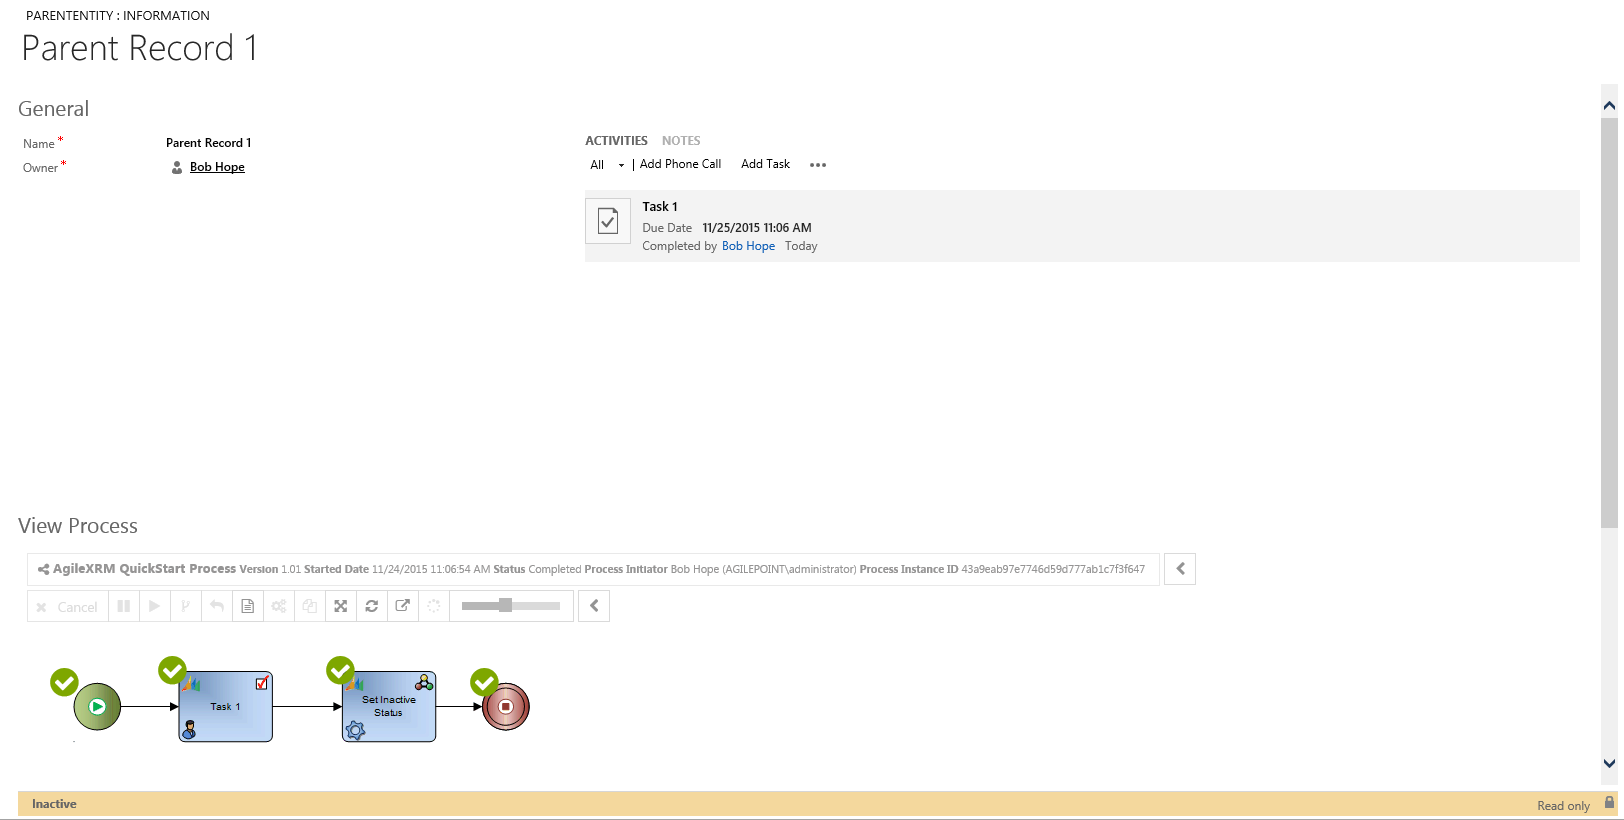
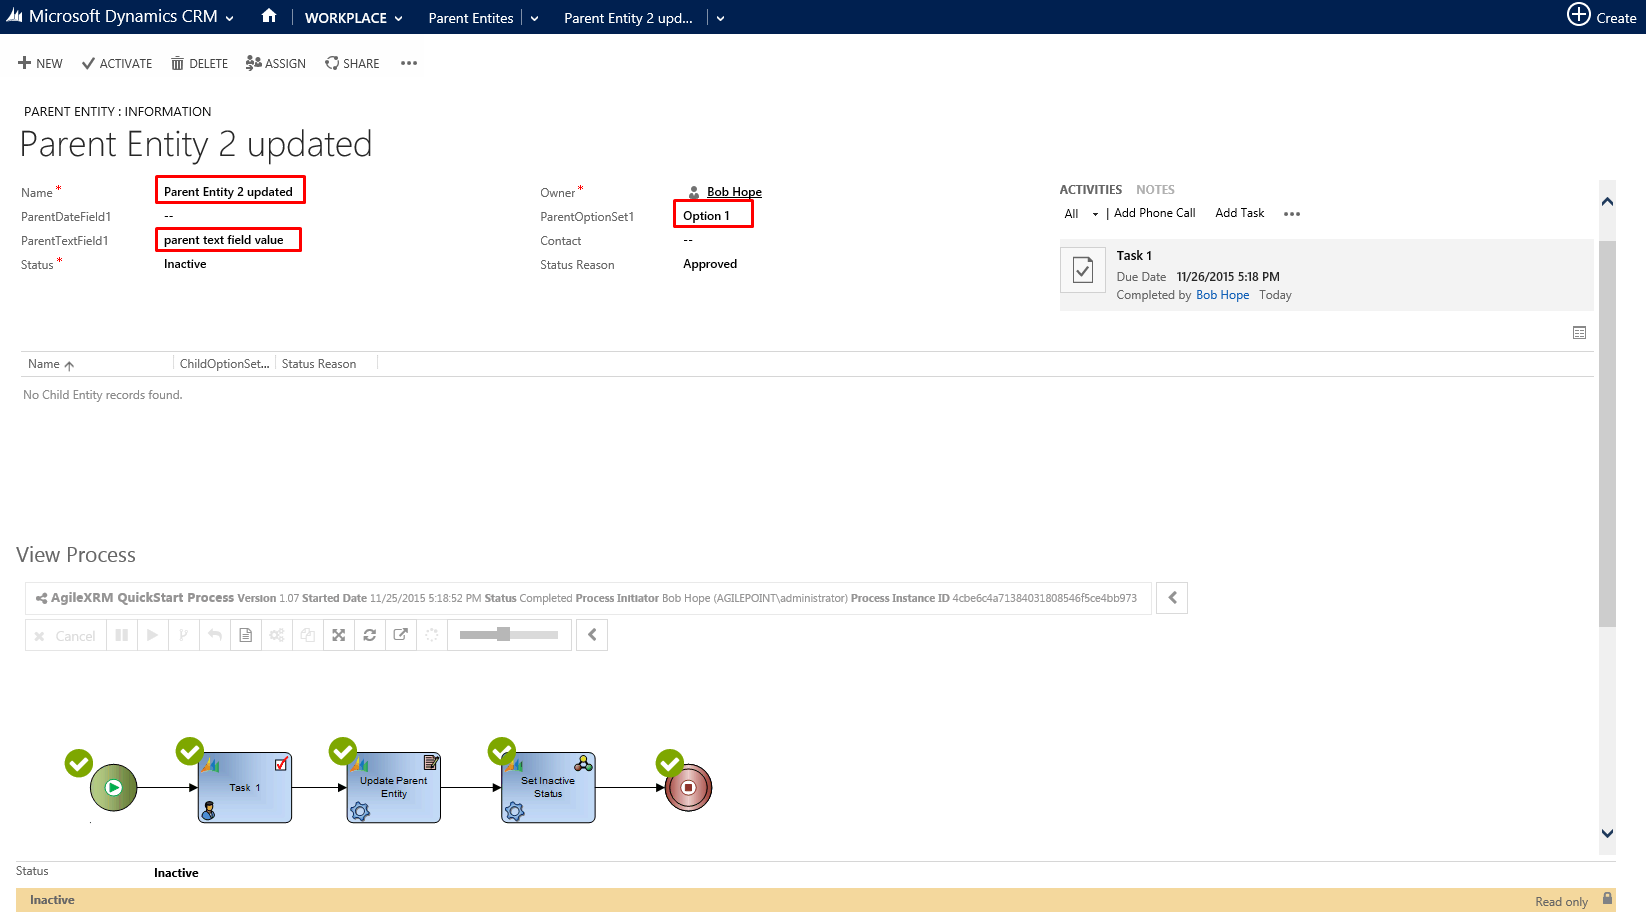
- Click F5 to refresh the record and notice that Status is now Inactive and Status Reason is approved and all fields are now read-only. The second activity in the process made this change.
This concludes this stage.
Stage 2: Using Activity-based Forms with AgileDialogs
Duration: 5 minutes
Objectives:
-
Show the use of activity-based forms in processes - each activity has its own specific form
-
Show that these forms can expose all the fields necessary to complete the task without having to navigate elsewhere, including fields from related entities.
Stage 2: Scenario
In this stage we are going to add an AgileDialogs Form to be used in Task 1; such Form is going to contain the input fields to be filled in by the user. We will also add a second shape which will update the underlying entity with the chosen values.
Associate a form to a Task
-
Open the process in Envision (Visio) that was created in Stage 1
Select the shape Task 1 and in the Design Task, click XRM category
-
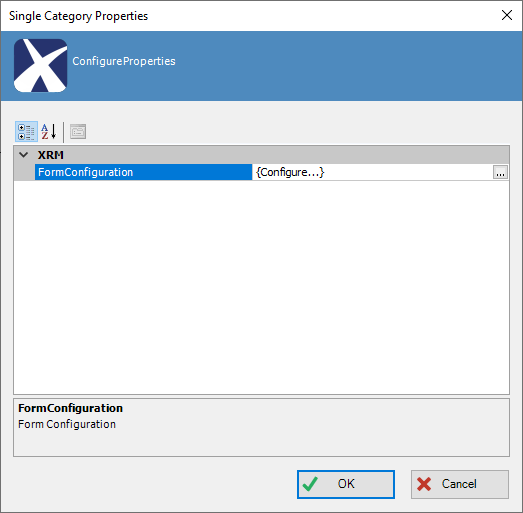
In the PageForm property, click the ellipsis button to show a new AgileDialogs Form, ready to be configured
-
Now, we will be associating an AgileDialogs form to Task 1. For that goal, a predefined template is going to be used. Once the AgileDialogs Form is opened, click on Import Form.
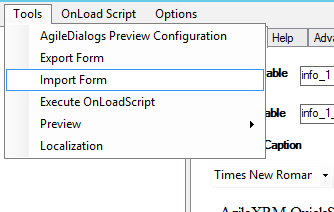
-
Look for the provided template AgileDialogs_Task1.xml and click Open. If the importation process has succeeded, the form should be visible and ready to be saved and deployed, as shown below.
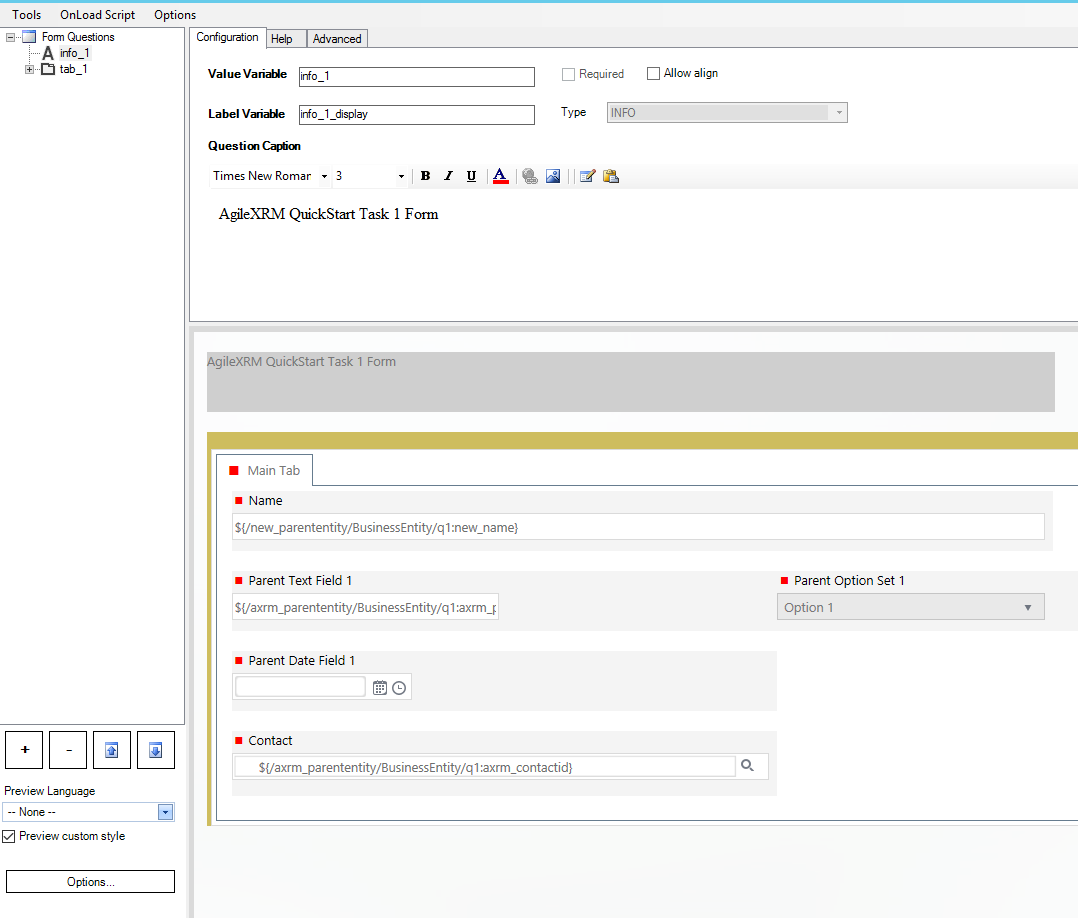
-
Click on Save to persist changes on Task 1 shape.
-
Back on the main menu, drag and drop another Update Entity shape (from the XRM Automatic Activities stencil) on to the canvas.
-
Name it Update Parent Entity.
-
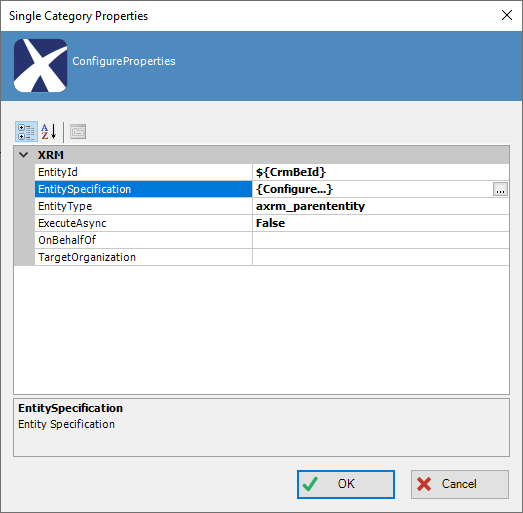
Select the shape, and click on XRM. Then, choose EntitySpecification, clicking on the ellipsis button.
-
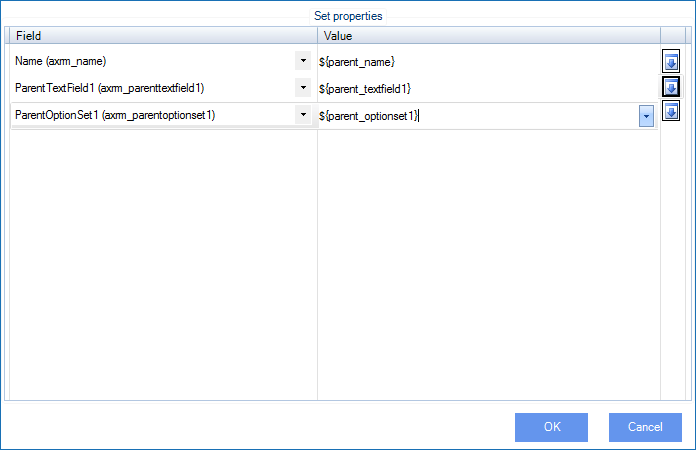
Link the Parent Entity fields against the process context variables that we have created in Task 1, accordingly. This can be accomplished by choosing the entity field name (on the left handside of the properties menu), and map it against the process context variable name (on the right handside, as shown below).
-
Connect it as shown, between Task 1 and Set Inactive Status shapes

-
Click on Update Parent Entity and select Help in the menu to open contextual help for this shape (You can also right-click the shapes in the stencil and click Help to see contextual help).
-
Close the Help window.
Publish and test new process
-
In AgilePoint ribbon, click Publish Process to Server to deploy new version of process.
-
Save the Visio diagram (Hint: Name the file the same as the Process name, that is AgileXRM QuickStart Process)
-
In CRM, create a new Parent Entity record to kick-off the new version of the process called Parent Record 2

-
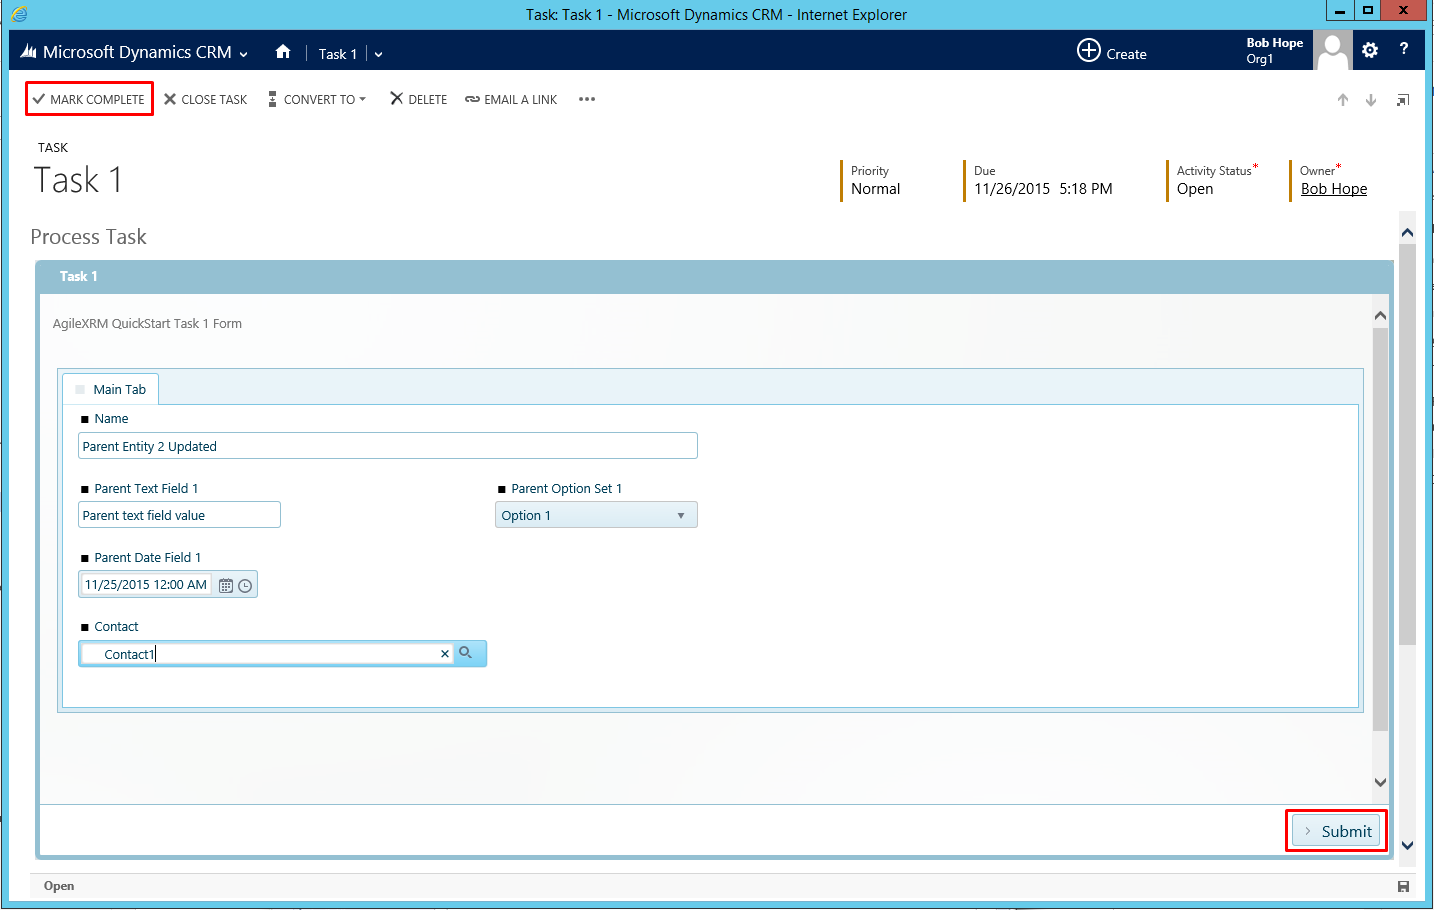
The process is started automatically. Click on Task 1 and then, click again on Open Task.
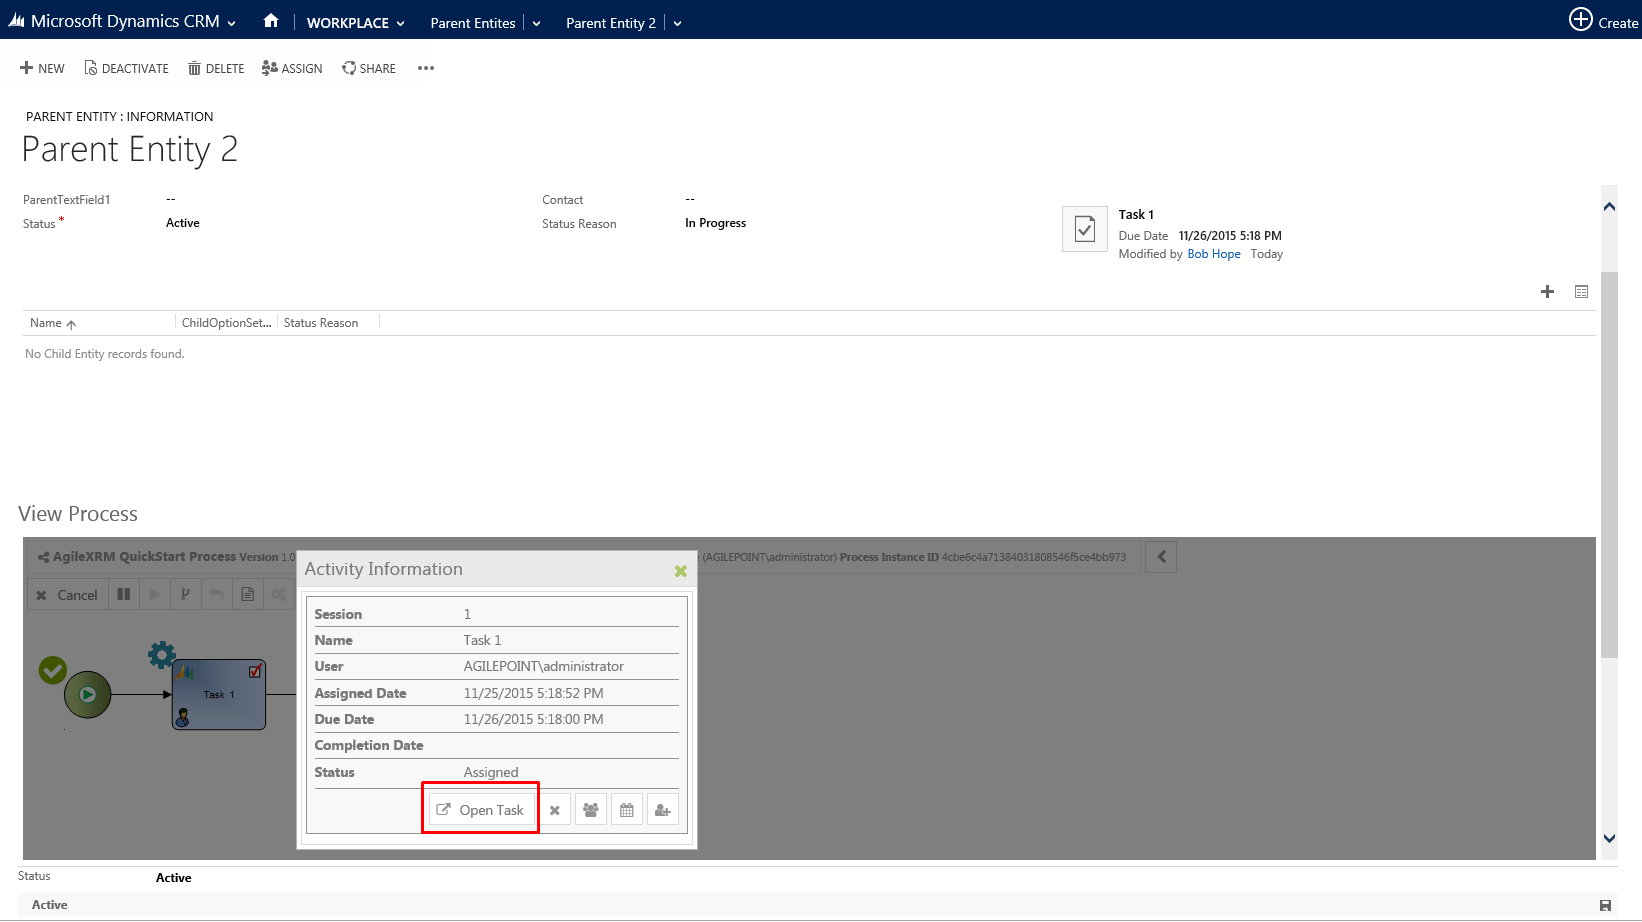
-
The AgileDialogs Form will be shown on screen. Type the values you want to update for Parent Entity 2. Finish by pressing Submit, and click on Mark Complete afterwards.
-
Back to the main screen, it is noticed that the process flow has kept going forward, the shape Update Parent Entity has been processed automatically and the process has been terminated. Please note the updated fields on Parent Entity 2.
This concludes this stage.
Stage 3: Updating Child Entity records
Duration: 5 minutes
Objectives:
-
Show that certain shapes can make use of predefined SubDialogs that take parallel actions to the main process.
-
Show that Option Set fields can be set based on a variable (not hardcoded).
-
Show that you can update the mentioned child entities making use of predefined shapes.
-
Show the use of Schema Picker window and the Query Expression window.
Scenario
In this stage we are going to create children entities of Child Entity type attached to our Parent Entity record in CRM, all by using our process template. For that goal, a new shape will be added with functionality to add those children entities through AgileDialogs interface.
Adding new Dialog Task shape
-
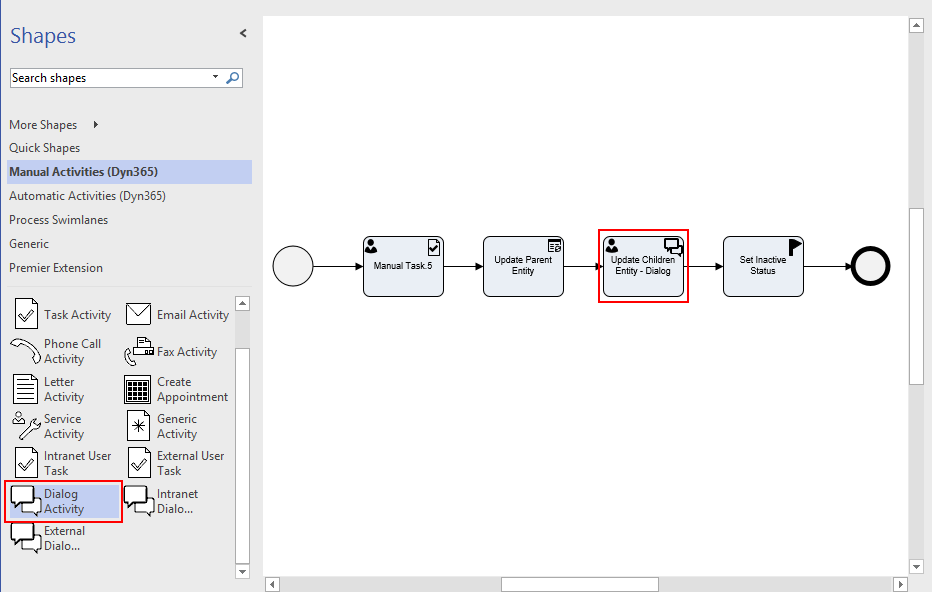
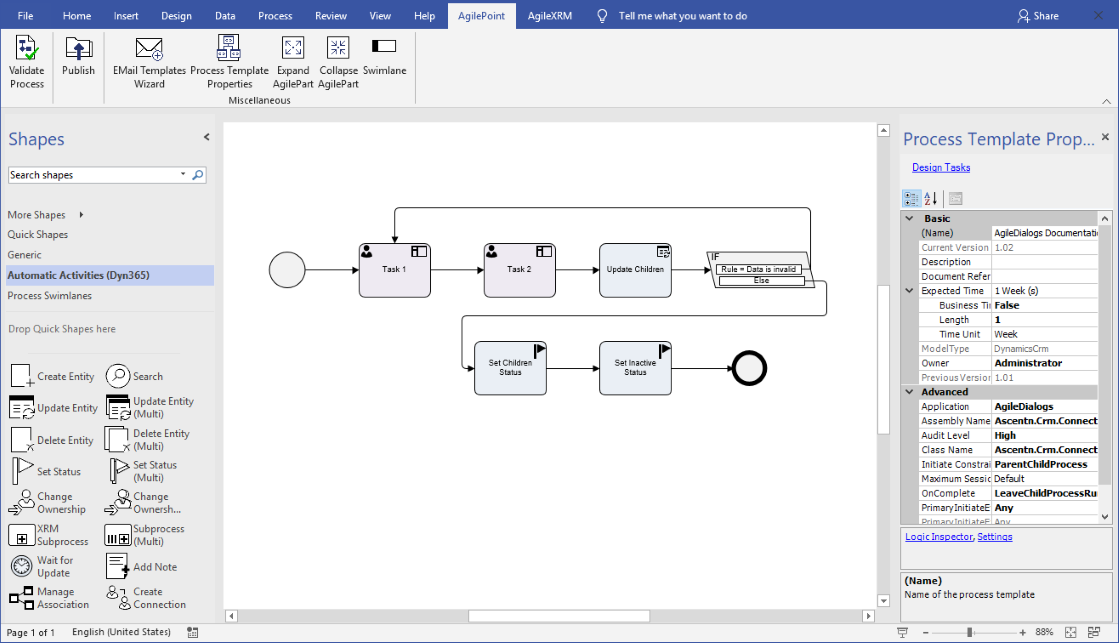
In the Visio diagram, drag and drop a Dialog Task shape from XRM Automatic Activities 2011 stencil, and name it Update Children Entity Dialog, as it is being shown below.
-
Select the shape and, in the Property Grid, select the value Mark as completed for the property AfterSubmitAction.
-
Click on the property Dialog by clicking on its ellipsis button. If asked, connect to the server clicking OK.
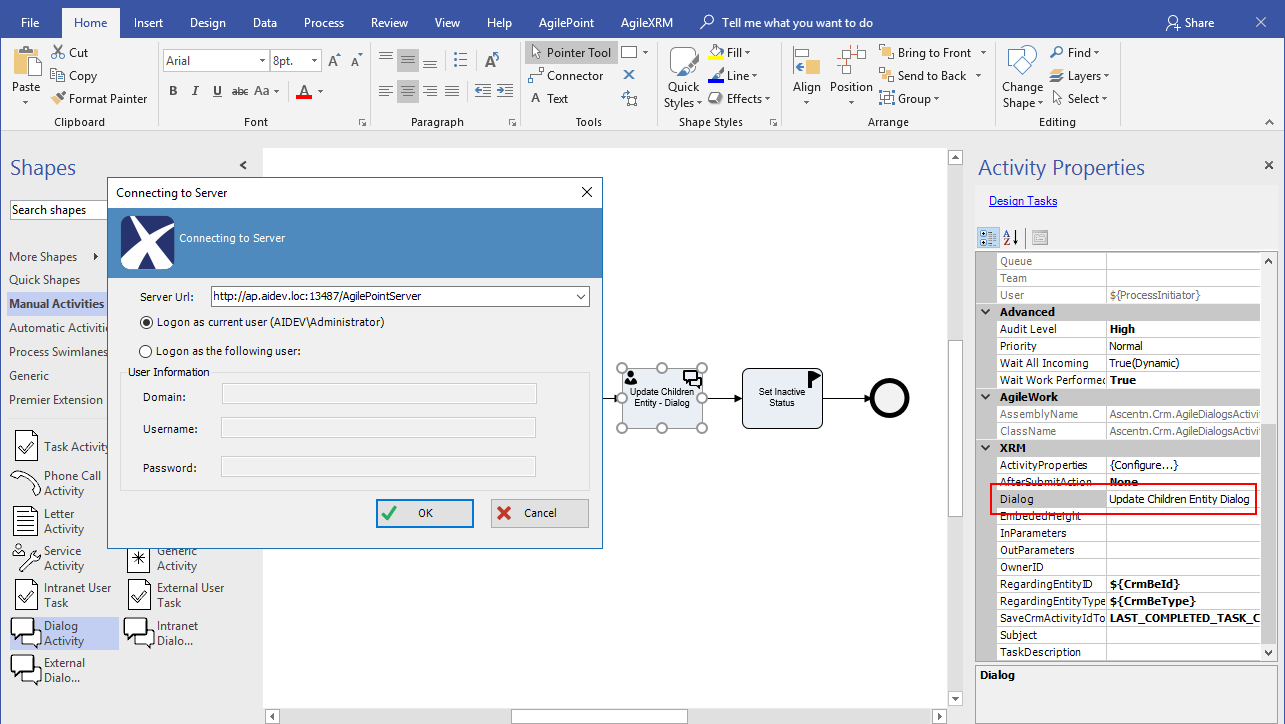
-
After connecting, select the previously published Dialog Update Children Entity Dialog (provided along with the rest of the necessary resources) as the chosen process template.
-
Later, click on the property InParameters; on the left handside, type the name parentBeId (SubDialog inner variable name); on the right handside, type ${CrmBeId} (business entity Id that we will be passing to the mentioned dialog dynamically).

-
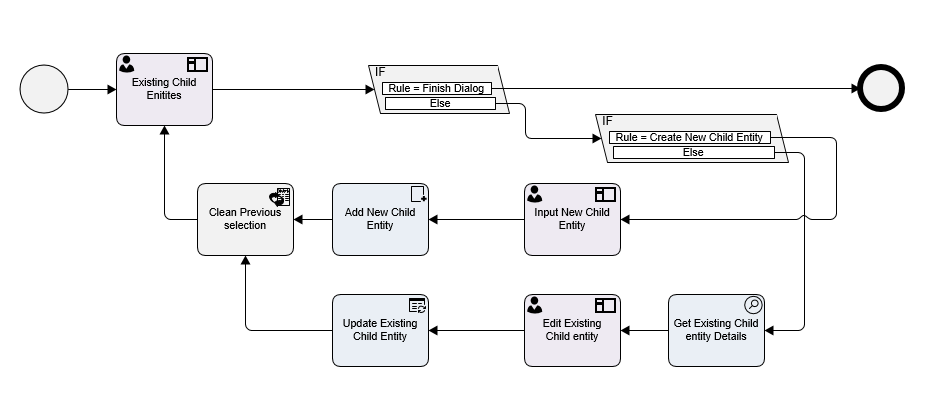
The SubDialog called Update Children Entity Dialog creates a whole new Dialog behind the scenes that executes itself in parallel, and depending of our main process. It will be getting the business entity Id (of type Main Entity), and will create / update entities of type child entity depending of the main entity running in the first place (picture of the template below). Go to Parent Entities and change the View to Inactive Parent Entities (to see the records created before).
-
Now, publish the main process against CRM, by clicking Publish Process to Server.
-
Once published, we should run a new instance of the process. For that goal, go to WorkPlace and select Parent Entities.

-
Choose the entity we used before and click on Activate. Once done, click on the ellipsis menu for the entity record, and choose Run Process.
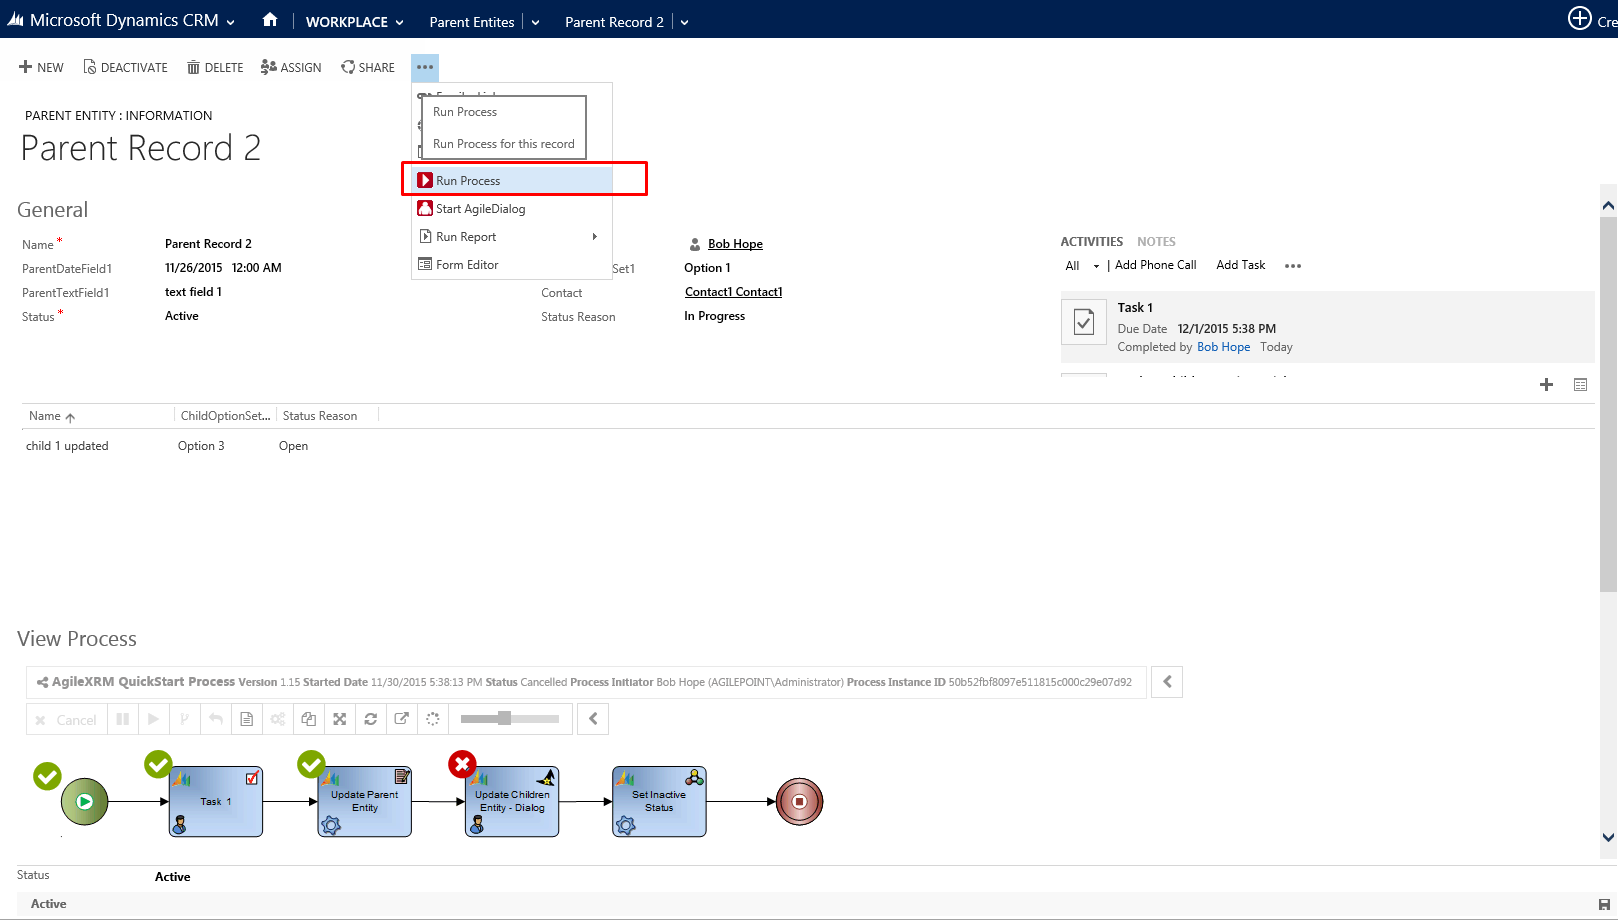
-
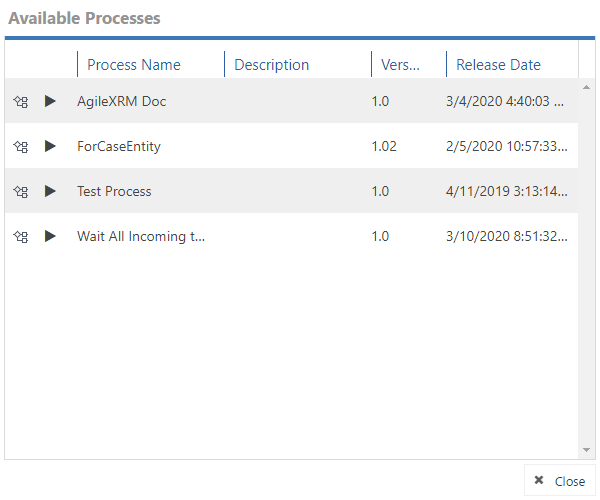
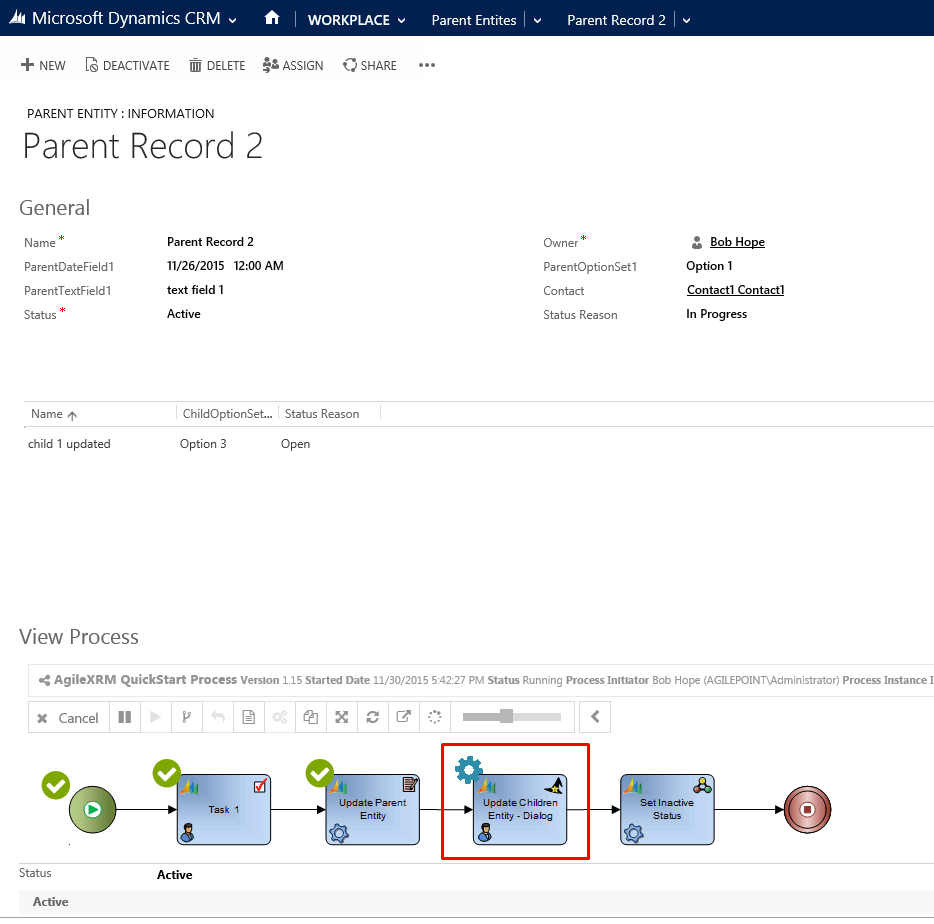
A pop-up menu comes up. Click on the play button for the AgileXRM Quickstart process.
-
Refresh the page, and a new instance for the process will be launched. Click again on Task 1, Open Task, and fill in the form as you did on Stage 2.
-
If everything went as expected, the process flow will be reaching the SubDialog. That means, that a new dialog has been launched on parallel and it is ready for showing its associated dialog.
-
Click on the shape, and select Open Task. Such task will be opened on a new popup window. The first form is showing us the list of child entity records that are associated to this main record of type main entity (image below).
-
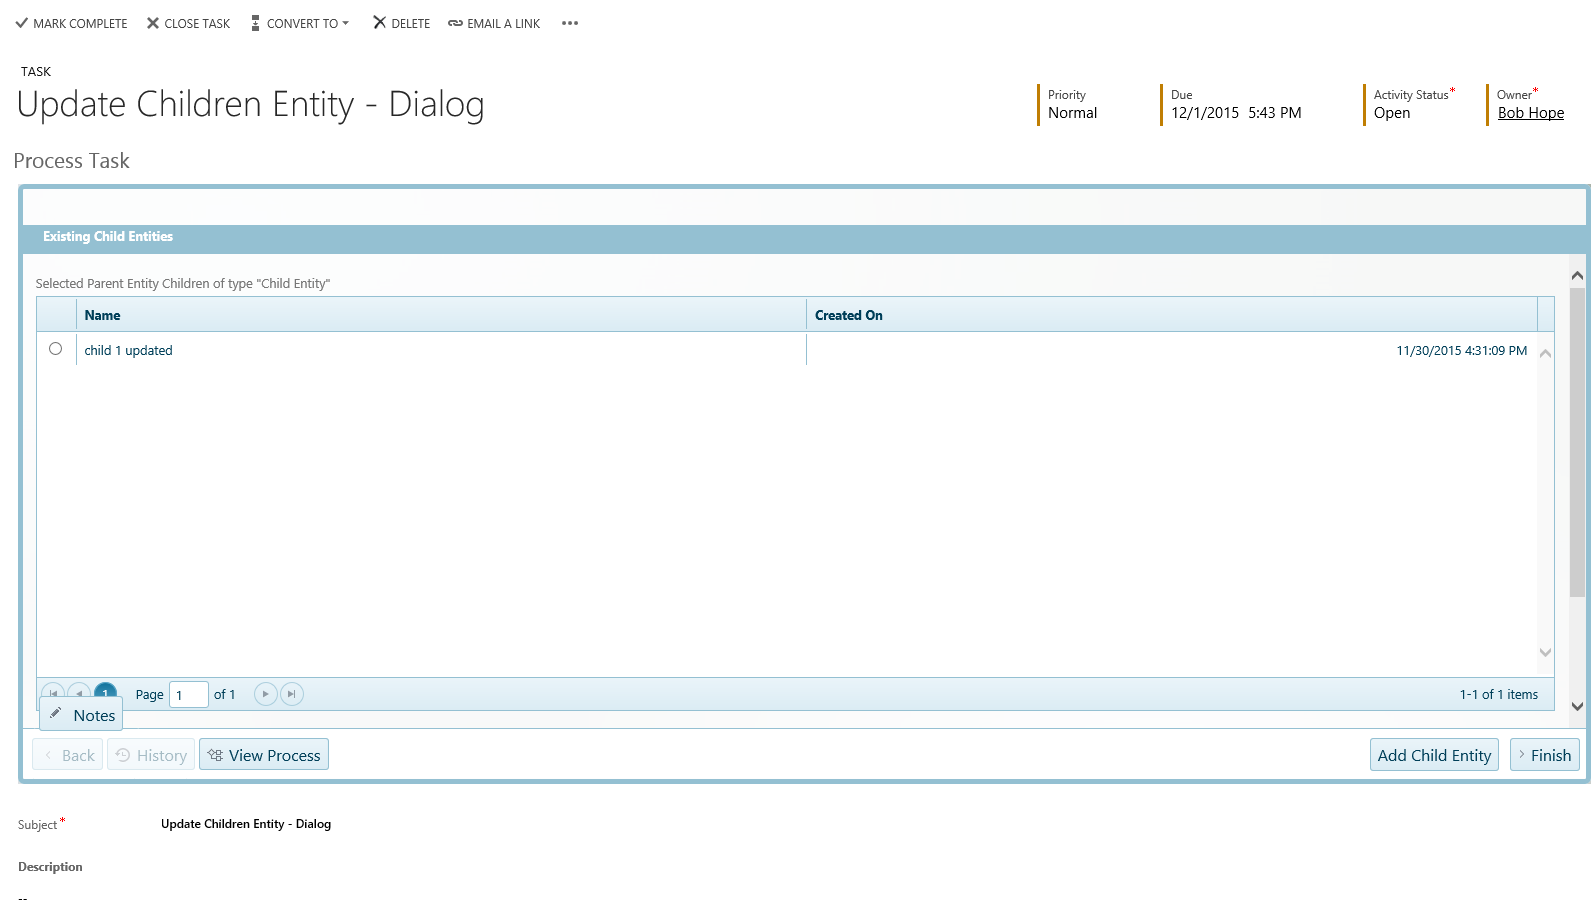
We can edit the records inside the grid to update values, or adding new records by ressing Add Child Entity. Press that button and a new form is shown, to type the record values (name and child option set fields). Type those, and press Next.

-
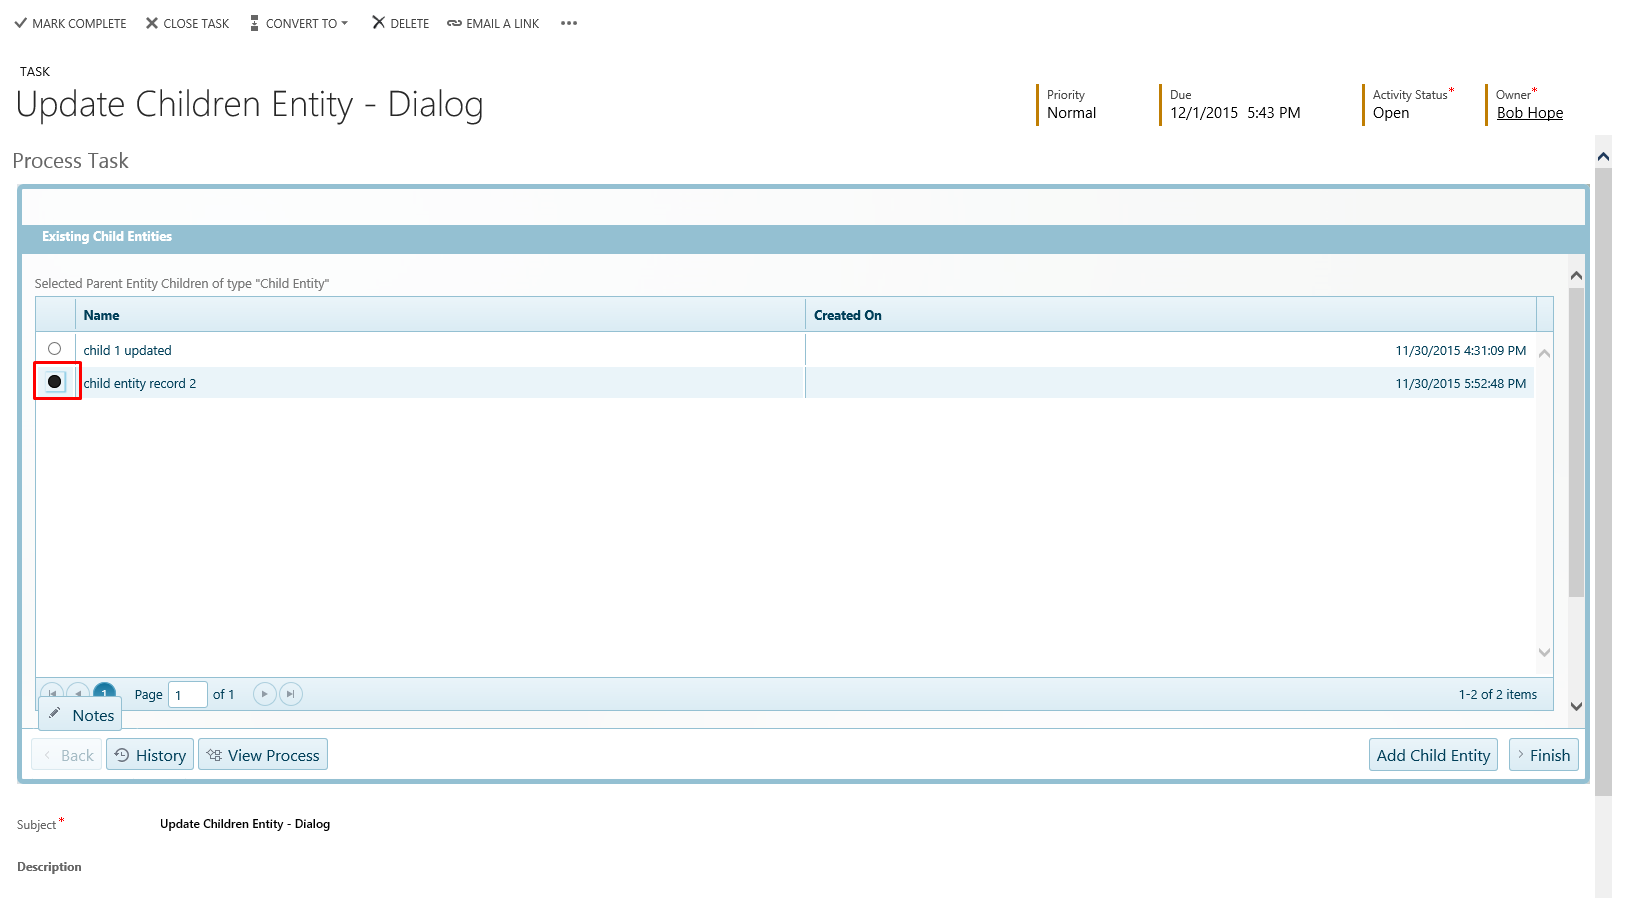
We have gone back to the main form, and the new record is being shown. If we want to edit the mentioned field, we will click on the row we want to edit (record).
-
The edition form is shown as well. Type the new values you want and press Next again.
-
Lastly, press Finish, and the whole SubDialog will have come to an end. The flow will have gone back to the main process, that it is going to be over after the entity is deactivated.
This concludes this stage.
Stage 4: Changing process flow at runtime
Duration: 5 minutes
Objectives:
- Show that end users with the right permissions can control the flow of the process (jump from any step to any step - forward or backward) while maintaining details for audit purposes.
Scenario
In this stage we are going to skip a process activity at runtime.
Change the flow
-
Create a new Parent Entity record and make sure to select a Contact. This will start a new process
-
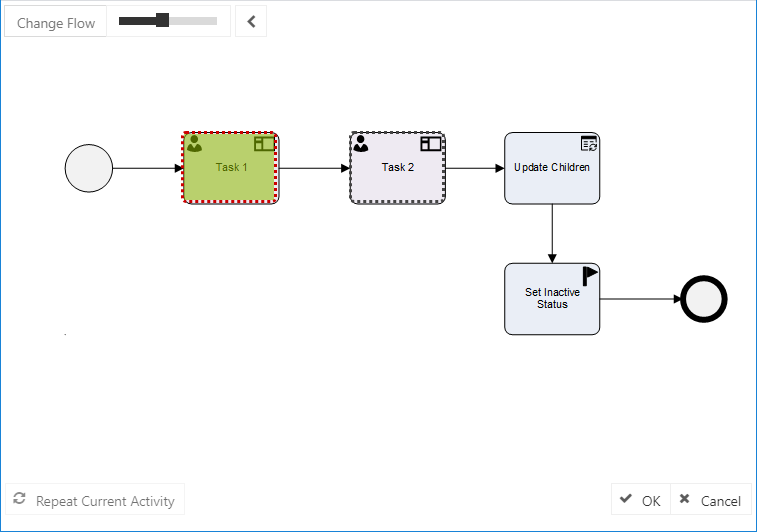
In the record form go to View Process section and click the Change Flow button

-
In the Real-Time Flow Change window select Task 1 (the red square means that this task will be cancelled) and Task 2 (the green square means that this is the destination activity) and click OK (Observe how the flow has changed and affected the CRM Tasks)
-
Leave this process instance running. Do not complete Task 2. It is needed in the next Stage
This concludes this stage.
Stage 5: Process migration
Duration: 10 minutes
Objectives:
-
Show how a user with the right permissions, can migrate a running instance of a process to a new version of the process definition, to handle changing business requirements.
-
Show branching mechanisms in processes and how these can loop back if required
Scenario
In this stage we are going to modify the process definition and migrate the process instance that we have left running in the previous stage to the new version of the process. The new process definition will include a multiple condition shape with a loop and a shape to update the Status of all child records.
Add the multiple condition shape
We want to go back to Task 1 if the Option Set field in Task 2 is set to the value Option 1:
-
Drag and drop a Multiple Condition shape from Generic stencil onto the canvas
(when this shape is added, the configuration window opens automatically) -
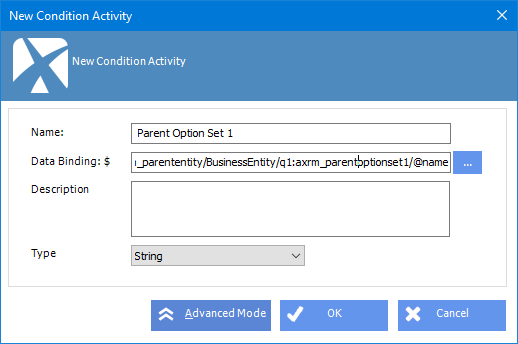
In the New Condition Activity window, enter Parent Option Set 1 in the Name field in the Data Binding field click the ellipsis button to open Schema Picker window
-
Type option in the Search Variable field to help locate the desired field
-
Select the name attribute of ParentOptionSet1 field to use it in the condition
-
Click OK to close the window

-
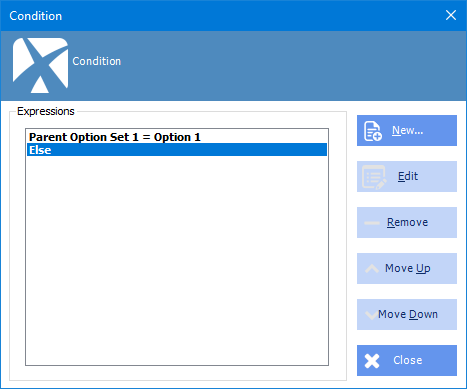
Click OK to open the Condition window
-
Click the New button to open the Expression window
-
Type Option 1 in Value and click OK to close the Expression window
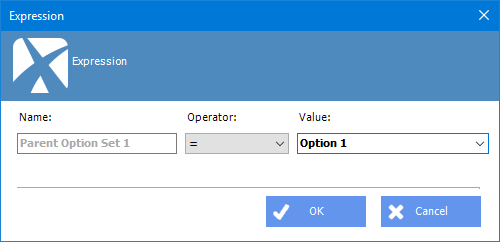
-
Click Close to close the Condition window
Add the multiple change status shape
-
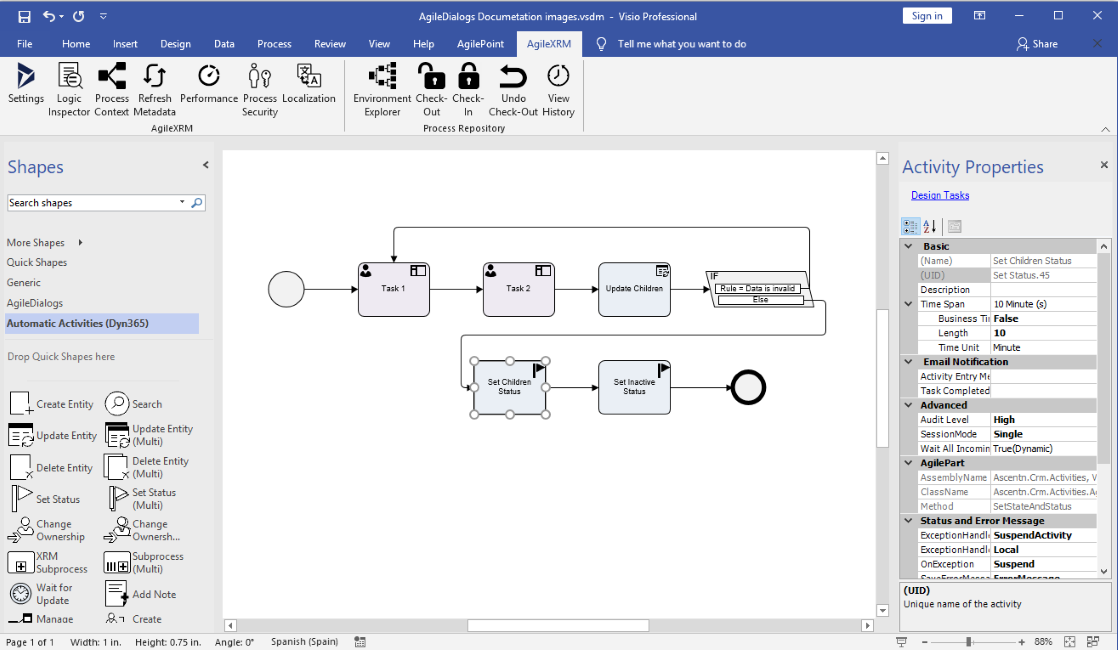
Drag and drop a Set Status (Multi) shape from the XRM Automatic Activities stencil and name it Set Children Status
-
Under XRM category in Property Grid, set Entity Name property to Child Entity and set Status property to Closed-Inactive
As the query expression for this shape is the same as the earlier Update Children step, let’s copy the query definition:
-
Click on the Set Children OptionSet shape to see its properties in the grid
-
In the QueryExpression property, double-click on the value part to select the content
-
Right-click the selected content, select Copy menu item to copy the content
(Do NOT use CTRL+C as it copies the whole shape and not just the value of the property grid) -
Click the Set Children Status shape to see its properties in the grid
-
Right-click on the value part of the QueryExpression property and select Paste
(Do NOT use CTRL+V as it pastes the whole shape and not just the property value) -
Connect the shapes as shown
-
Publish new version of process like before (in AgilePoint ribbon click Publish Process to Server), and Save Visio diagram
-
Open the Parent Entity record that we left running in the last Stage and go to View Process section
-
In the Process Manager, click the Suspend button so that users cannot interact with the process

-
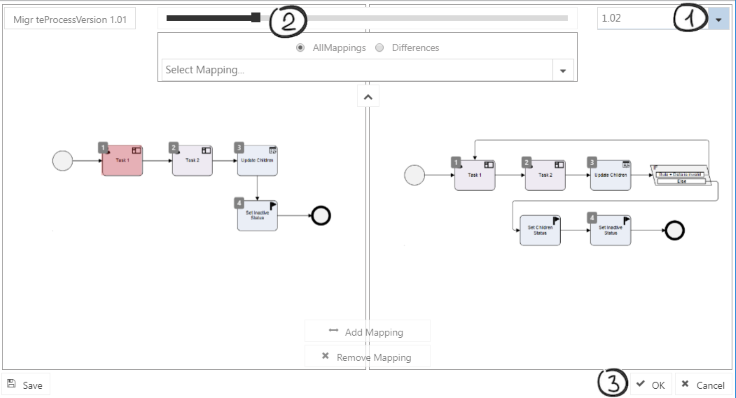
Click the Migrate button to open the Real-Time Process Migration window

-
Select the latest version of the process
-
Use the Zoom Slider to visually compare the two versions of the process
-
Click OK to migrate the running process to the new version
You can see that the process is now running with the latest version of the process definition.
-
Click the Resume button to resume the process

-
In Task 2 choose Option 1, and make sure it has some child records added. Then Save Data and Mark Complete
-
In Process Manager note how process goes back to Task 1 because of the conditional shape
-
In Process Manager click on Task 1 and notice that the details of the shape shows 2 sessions
-
Open Task 1 again
-
This time in Task 2 make sure not to select Option 1, click Save Data button and Mark Complete
-
In the Parent Entity, refresh the child grid and note how the Status/StatusReason has changed to Inactive/Closed for all child records
This concludes this stage.
Stage 6: Using AgileDialogs
Duration: 10 minutes
Objective:
- Show the use of dialogs instead of forms in completing a task.
Scenario
An AgileXRM task can be associated to a dialog created using AgileDialogs instead of an AgileLightForm. These dialogs are used to gather information from the user via a wizard-like interface.
We are going to change Task 1 to use a predefined dialog instead of an AgileLightForm.
Deploy the Dialog
The dialog is already modeled and is stored in a Visio file where the SDK isinstalled (normally in C:\Program Files(x86)\AgileXRM\SDK\Samples\QuickStart )
-
Locate the QuickStart AgileDialog.vsd file
-
Open the file with Visio - You’ll get an Unable to connect to the remote server error. Click OK.
-
The Connection window pops-up. Ensure that the connection configuration is pointing to your CRM Server and organization, and click OK
-
Publish this dialog following the same instructions under Publish Process in Stage 1, including adding the Process Permissions
Adding the Dialog Task
-
In Visio switch to AgileXRM QuickStart Process model, remove Task 1 by clicking it to select it and then pressing Delete
-
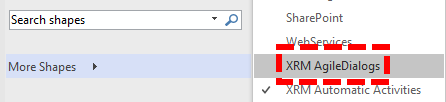
Click on ShapesMore > ShapesAgilePointXRM > AgileDialogs to open the stencil
-
Drag and drop a Dialog Task shape and name it Dialog 1
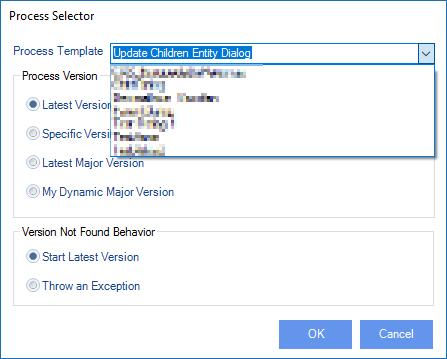
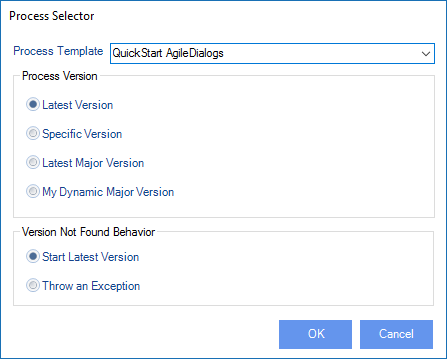
In the property grid, under XRM, click the ellipsis button of the Dialog property to open Process Selector window
-
Select QuickStart AgileDialog under Process Template and click OK
-
Connect the shapes and publish the process as before
-
Create a new Parent Entity record to start a new process instance
-
Open Dialog 1 activity and notice this time a dialog is presented to us
-
Fill the different controls on this page and click the Next button
(Notice there are validations, CRM Option sets, CRM Lookups and Datetime controls)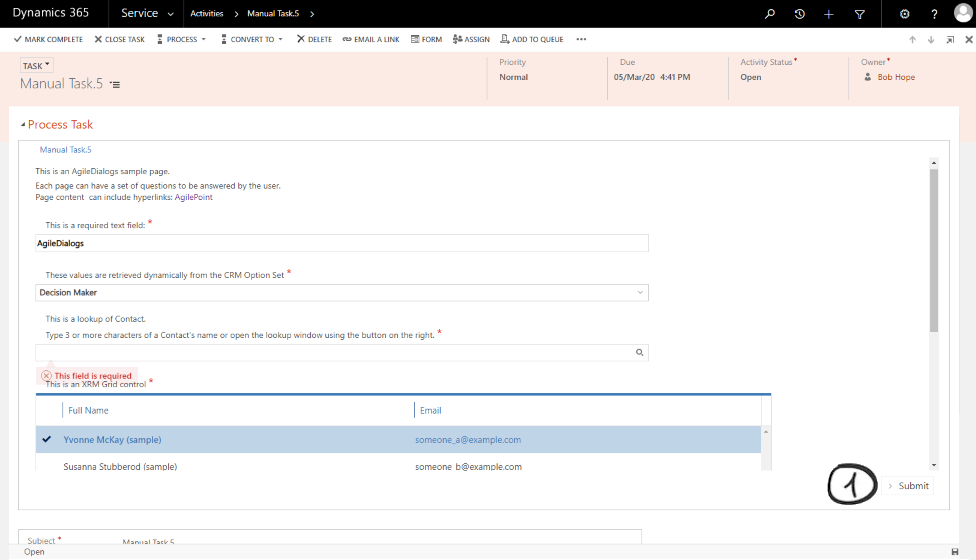
-
Click the Back button and change some of the fields and click Next again
-
Click the Viewer button to see the model for the dialog (This button is not normally visible to end-users)
-
Click Next until the dialog is completed
Notice that when the dialog is finished the process continues to the next step.
This concludes this stage.